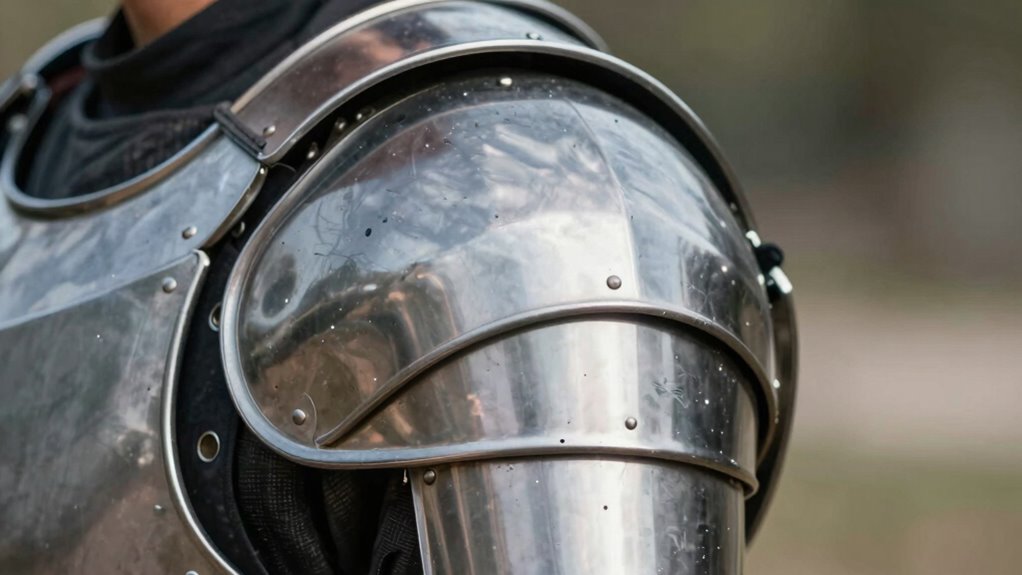
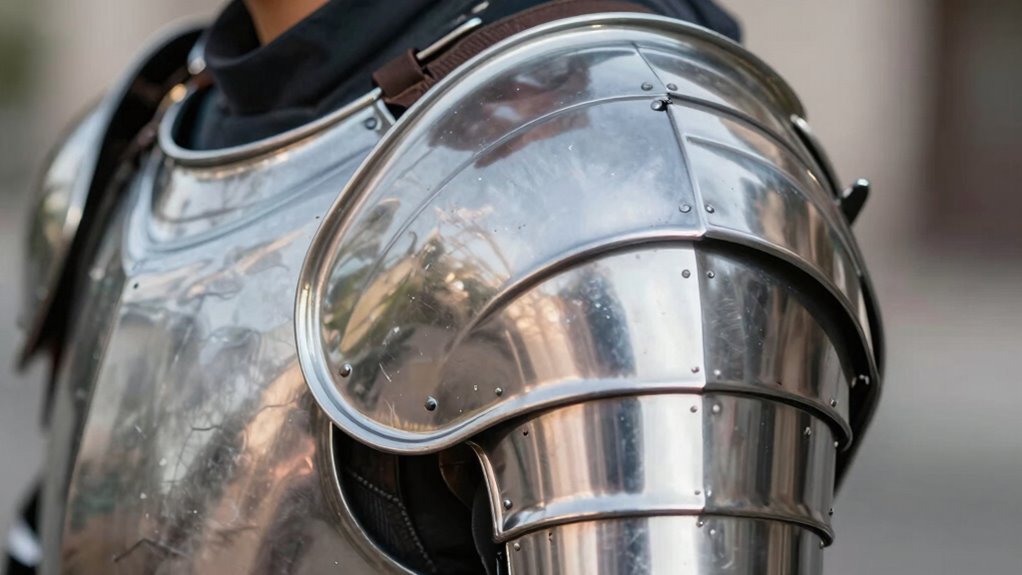
To check if your shoulder armor fits properly using the ‘reach test,’ stand upright and extend one arm across your chest to touch your opposite shoulder blade. Move smoothly without forcing your arm, paying attention to any shifting or resistance. If the armor shifts excessively or restricts movement, it’s a sign of a poor fit. If you want detailed tips on performing and interpreting the test, stay with us—you’ll discover how to achieve perfect armor fit.
Key Takeaways
- The reach test involves raising arms to check if shoulder armor moves smoothly without gaps or excessive shifting.
- Proper shoulder armor fit allows full range of motion during the reach test without restricting movement.
- Excessive movement or shifting during the test indicates the armor is too loose or improperly positioned.
- Restricted movement or pinching suggests the armor is too tight or poorly adjusted for comfort and mobility.
- Regularly performing the reach test helps identify fit issues and ensures optimal placement for protection and comfort.
Why Proper Shoulder Armor Fit Matters for Safety and Comfort
Properly fitting shoulder armor is essential because it directly impacts both your safety and comfort. In costume design, accurate fit ensures the armor looks authentic and aligns with historical accuracy, making your outfit believable. Ill-fitting shoulder armor can shift during movement, creating gaps that reduce protection and increase discomfort. When armor fits well, it distributes weight evenly, preventing strain on your shoulders and neck. This proper distribution also helps maintain armor stability during active movement. Achieving the right fit also enhances the overall appearance, ensuring historical details are preserved. Using the reach test can help identify poor fit and ensure your armor stays securely in place. Proper shoulder armor fit also involves understanding the contrast ratio, which affects how well the armor’s details are perceived under different lighting conditions. Additionally, considering the ergonomic design of the armor contributes to more natural movement and better comfort during extended wear. Whether for reenactments or cosplay, proper shoulder armor fit keeps you safe, comfortable, and true to the era you’re representing.
How to Use the Reach Test to Check Your Shoulder Armor Fit

Wondering how to guarantee your shoulder armor fits correctly? The reach test is your go-to method. It helps you assess whether your armor allows natural movement without chafing or gaps. Focus on design considerations like the shape and adjustability of the armor, and material selection for flexibility and durability. To perform the test, raise your arms forward and sideways, ensuring full range of motion. Observe how the armor moves—if it shifts excessively or restricts movement, it’s a sign of poor fit. Properly fitting armor should permit a full range of motion, which the reach test effectively evaluates. Here’s a quick visual:
| Arm Position | Armor Response | Fit Indicator |
|---|---|---|
| Forward lift | Moves smoothly | Good fit |
| Side lift | Binds or shifts | Poor fit |
| Downward | No gaps or chafing | Proper fit |
| Upward | Restricted movement | Bad fit |
| Resting | Comfortable contact | Ideal fit |
Adjust accordingly for suitable comfort and safety. Regularly checking body measurements can also help ensure the armor continues to fit properly over time. Incorporating proper fit assessment techniques like the reach test is essential for maintaining optimal protection and mobility.
Step-by-Step: Performing the Reach Test Correctly

To perform the reach test correctly, start by standing upright in a comfortable position with your shoulders relaxed. Extend your arm across your chest, aiming to touch your opposite shoulder blade. Keep your movement smooth to accurately gauge material compatibility; avoid forcing or jerking the armor. Pay attention to how the material moves—stiff or restrictive armor can hinder your reach and indicate poor fit. Ensure your armor’s placement doesn’t interfere with your natural posture, respecting aesthetic considerations like symmetry and alignment. Repeat the test on both sides to spot inconsistencies. If the armor restricts your movement or causes discomfort, it’s a sign that adjustments are needed for better material compatibility and visual harmony. Proper technique ensures a reliable assessment of your shoulder armor fit. Incorporating air-based cooking principles like careful measurement and understanding material flexibility can also help in customizing armor for optimal comfort, emphasizing the importance of precision fitting in achieving the best results. Additionally, considering adjustable features in your armor design can facilitate better fit and ease of movement over time. Recognizing the necessity of ergonomic design can further enhance comfort and functionality during wear. When selecting armor, paying attention to material flexibility can significantly improve overall comfort and performance during active movement.
How to Interpret Reach Test Results : Is Your Fit Good?

How can you tell if your shoulder armor fits well after performing the reach test? If your shoulder armor moves comfortably with your arm without restricting movement or causing discomfort, it’s a good sign of proper fit. Unlike fashion trends that favor tight or oversized styles, historical armor prioritized mobility and protection. If the armor feels loose, it might shift too much during movement, indicating a poor fit. Conversely, if it’s too tight, it can restrict motion and cause pain. A proper fit allows you to emulate the functional design of historical armor, which balanced protection with ease of movement. Use the reach test results as your guide: a good fit should feel natural and secure, not restrictive or loose. Regular adjustments and understanding of armor fitting principles can further help ensure optimal comfort and protection, providing confidence in your gear during activity. Additionally, paying attention to proper padding and lining can enhance fit and comfort over time. Incorporating protective padding can also mitigate any pressure points and improve overall wearability.
Signs Your Shoulder Armor Is Too Tight or Too Loose
If your shoulder armor doesn’t feel right during movement, it’s a clear sign that something’s off. Too tight, and you might notice restricted arm motion or discomfort, indicating poor padding selection or overly snug fit. Conversely, if it’s too loose, the armor may shift or rattle, reducing protection and signaling inadequate material durability or improper sizing. Tight armor can cause chafing or pinching, while loose armor compromises stability. Pay attention to how the padding interacts with your shoulders—should it feel snug but not restrictive? Also, consider the material durability; high-quality materials hold their shape better over time, maintaining a proper fit. Recognizing these signs helps you identify when your shoulder armor needs adjustment for best safety and comfort. Additionally, connected technology can be used to monitor fit and comfort levels through smart sensors embedded in the padding, providing real-time feedback for optimal adjustment. Incorporating smart sensors that track movement and pressure can further optimize fit and prevent discomfort during extended wear.
How to Adjust Shoulder Armor for a Snug, Comfortable Fit

Adjusting your shoulder armor for a snug, comfortable fit begins with identifying the areas that need fine-tuning. Start by inspecting the padding—adding custom padding can fill gaps and prevent shifting. Use padding made from flexible materials that conform to your shoulder’s shape, enhancing comfort and stability. Next, check the armor’s placement; if it feels loose, tighten straps or fasteners gradually, ensuring the armor stays close to your body without restricting movement. If it feels too tight, loosen straps slightly and add more padding where needed. Material flexibility plays a *vital* role—armor with flexible components adapts to your movements and reduces pressure points. Properly evaluating fit ensures that your armor provides maximum protection while maintaining comfort during activity. Understanding how adjustable features work allows you to fine-tune your fit precisely. A proper fit is essential to prevent discomfort and ensure safety during use. Additionally, checking fit during activity helps maintain optimal comfort and protection. Regularly assessing and fine-tuning the fit can prevent discomfort caused by shifting or improper placement. Fine-tuning these adjustments helps achieve a secure, comfortable fit that stays in place during activity.
Tips for Maintaining Long-Term Comfort and Safety

To guarantee your shoulder armor remains comfortable and safe over time, regular maintenance and inspection are essential. Start by checking for signs of wear, such as cracks, corrosion, or loose fittings. Proper material selection is key—choose durable, high-quality materials that resist damage and maintain structural integrity. When cleaning, use appropriate products that won’t degrade the material or compromise safety. Aesthetic considerations also matter; keeping your armor clean and polished boosts confidence and ensures visibility. Adjust straps and fittings periodically to prevent shifting or discomfort during extended wear. Additionally, understanding materials used in armor can help you select options that offer optimal durability and comfort. By staying vigilant and attentive to both functional and visual aspects, you’ll extend the lifespan of your armor while maintaining superior comfort and safety throughout its use.
FAQs About Shoulder Armor Fit and Reach Testing

Ensuring your shoulder armor fits properly and allows full range of motion is essential for comfort and safety. Many ask how historical armor influenced modern designs and the importance of cultural significance in fit. Historically, armor was crafted to balance protection and mobility, which informs today’s fit standards. The reach test helps identify if your armor restricts movement or fits poorly, ensuring you don’t sacrifice mobility for protection. Cultural significance plays a role in how shoulder armor is designed and worn, reflecting traditions and regional styles. FAQs often cover how to adjust armor for better comfort, the importance of proper fit, and how historical practices influence current fitting methods. Remember, a well-fitted piece respects both function and cultural heritage, enhancing both safety and authenticity.
When to See a Professional for Shoulder Armor Adjustments
If you notice persistent discomfort, restricted movement, or gaps that compromise protection, it’s time to see a professional. Proper shoulder armor fit depends on material compatibility and precise adjustments to guarantee durability and comfort. A professional can assess whether your armor aligns with your body shape and activity needs, addressing any issues with fit or protection. They’ll also consider aesthetic considerations, making sure your armor looks good while maintaining functionality. If your armor causes chafing, shifts during movement, or looks mismatched, professional adjustment is essential. Attempting to fix these problems yourself might worsen the fit or damage the materials. Ultimately, consulting an expert ensures your shoulder armor is both effective and visually appropriate, keeping you safe and confident in your gear.
Frequently Asked Questions
Can the Reach Test Be Performed While Wearing Additional Protective Gear?
Yes, you can perform the reach test while wearing additional gear, but it might affect test accuracy. Extra protective equipment can restrict movement or alter how the armor fits, leading to less precise results. To get the most accurate assessment, it’s best to eliminate any unnecessary gear and focus on the shoulder armor itself. This ensures you accurately identify if the fit is right or needs adjustment.
How Often Should I Recheck My Shoulder Armor Fit?
You should recheck your shoulder armor fit regularly, ideally every few months or after any impact or armor maintenance. Proper adjustment is key to guaranteeing ideal protection and comfort. Use the reach test to confirm your armor still fits properly, especially if you notice discomfort or restrictions in movement. Regularly inspecting and adjusting your armor helps maintain its protective effectiveness and ensures it remains properly fitted over time.
What Common Mistakes Should I Avoid During the Reach Test?
During the reach test, avoid incorrect positioning of your shoulder armor, which can skew results. Don’t overtighten straps, as this can cause discomfort and false assessments of fit. Keep your posture natural and relaxed, ensuring the armor sits properly without forcing it into place. Focus on a smooth, controlled reach to accurately gauge fit. Steer clear of rushing the test, and double-check your straps for proper tension before starting.
Does Body Size or Shape Affect Reach Test Results?
Your body shape and mobility limitations can definitely affect reach test results. If you have broader shoulders or limited shoulder mobility, you might find it harder to reach, making it seem like your armor fits poorly. Keep in mind that these factors don’t mean your fit is bad—just that you might need to adjust your armor or work on mobility to get the best results. Focus on comfort and proper fit above all.
Are There Specific Materials That Impact Shoulder Armor Flexibility?
Certain materials, like foam or pliable plastics, enhance shoulder armor flexibility, making it easier to perform the reach test. These materials allow for better movement without sacrificing armor durability. Rigid materials, such as hard plastics or metal, tend to limit flexibility but offer increased durability. Choosing the right balance between material flexibility and armor durability depends on your activity level and comfort preferences, ensuring a proper fit and effective protection.
Conclusion
Think of your shoulder armor as the sturdy sails guiding your journey. When properly fitted, they catch the wind with ease, ensuring a smooth ride. But if they’re too tight or loose, the voyage becomes uncomfortable and risky. Use the reach test as your compass, and adjust accordingly. With the right fit, you’ll sail confidently—protected, comfortable, and ready for whatever adventure awaits on the horizon.