

To set suspension sag like a pro in 10 minutes, start by measuring static ride height with the bike unloaded on a flat surface using a tape measure. Then, sit on the bike in your normal riding stance and measure again. Subtract the static height from the loaded measurement to find the sag. Adjust preload collars or spring tension incrementally until you reach the ideal sag percentage for your weight and riding style. If you want to master the full process, keep going for detailed steps.
Key Takeaways
- Measure static and rider-loaded sag accurately using a tape measure or ruler on a level surface.
- Adjust preload in small increments, typically quarter-turns, and secure settings for consistent results.
- Use a reliable scale and maintain consistent body position during measurements to ensure precision.
- Fine-tune sag based on terrain and riding style, testing after each adjustment for optimal handling.
- Recheck and readjust sag regularly during rides to maintain suspension performance and safety.
Why Proper Suspension Sag Matters for Your Ride Performance

Proper suspension sag is essential because it directly influences your motorcycle’s handling, stability, and comfort. Correct sag ensures the suspension responds appropriately to terrain and rider input, maintaining ideal tire contact with the road or trail. When sag is set accurately, the suspension can absorb shocks efficiently, reducing rider fatigue and improving control. Insufficient sag causes the suspension to feel stiff, decreasing traction and increasing the risk of bottoming out. Excessive sag results in a sluggish response, compromising cornering precision and stability. Precise sag adjustment balances the suspension’s ability to support your weight while allowing enough movement for dynamic riding conditions. Additionally, European cloud innovation can offer tools and resources to help riders fine-tune their suspension settings more effectively. Ultimately, maintaining proper sag enhances overall ride quality, ensuring safety, responsiveness, and a smoother experience across varied surfaces.
How to Measure Your Motorcycle or Mountain Bike Sag in 3 Simple Steps

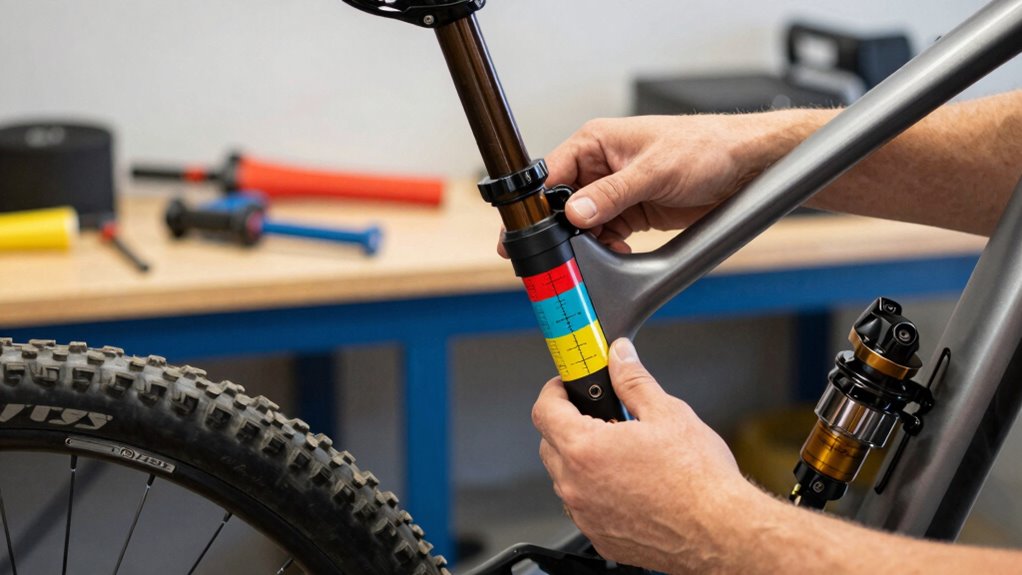
To accurately measure your motorcycle or mountain bike sag, start by positioning the bike on a flat, level surface and ensuring all suspension components are unloaded by removing rider weight. Next, measure the static ride height by noting the distance between a fixed point on the frame and a reference on the suspension (such as the axle or a specific point on the swingarm). Then, sit on the bike in your riding posture, maintaining a relaxed position, and measure the new distance at the same reference point. Subtract the static measurement from the seated measurement to determine the total sag. This precise measurement gives you a baseline to adjust suspension settings effectively, ensuring ideal performance and handling tailored to your weight and riding style. Additionally, using simple tools like a ruler or tape measure can help you get accurate readings quickly and easily. It’s also helpful to understand the difference between static and dynamic sag, which can influence your suspension tuning for different riding conditions. Being familiar with how suspension components behave under load can further improve your setup accuracy.
Adjusting Your Suspension Sag: Tools and Techniques You Need
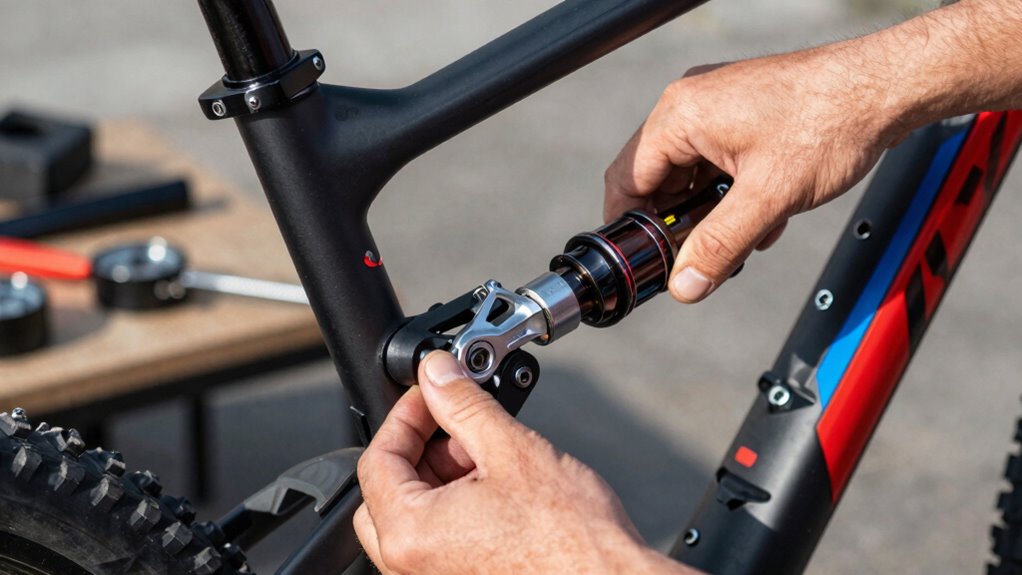
Having the right tools is essential for accurately adjusting your suspension sag. You’ll need a reliable torque wrench to tighten components to manufacturer specifications, ensuring consistent preload adjustments. A measuring tape or ruler is critical for precise sag measurement, allowing you to verify the correct amount of suspension compression. A spanner or socket wrench set facilitates adjustments to preload collars or threaded components, providing fine control over sag settings. Some riders prefer specialized suspension tools like a sag gauge or a shock pump, which enable more exact pressure and preload adjustments. Technique-wise, always loosen or tighten preload adjusters incrementally, checking sag after each change. Properly securing your bike and maintaining consistent measurement points are key for achieving precise, repeatable sag adjustments that optimize performance. Additionally, understanding AI ethics can help you consider the implications of automated or sensor-based suspension systems for improved tuning.
Setting Sag for Different Riding Styles and Conditions

Adjusting sag based on terrain guarantees ideal traction and control, whether you’re tackling rough trails or smooth pavement. You must also tailor sag to your weight to maintain consistent suspension performance across different loads. Finally, matching sag to your riding style—aggressive or relaxed—maximizes comfort and handling.
Adjust Sag for Terrain
Since different terrains demand varying suspension responses, setting the sag appropriately for each riding condition is essential. On rocky or technical trails, increase sag slightly to enhance wheel contact and improve shock absorption. For smooth, flowing terrain, reduce sag to maintain better chassis stability and responsiveness. When riding on loose surfaces like sand or gravel, set sag to maximize plushness while preventing excessive bottoming. Adjust your preload to achieve the desired sag measurement specific to the terrain, ensuring consistent handling. Remember, subtle changes in sag can considerably impact traction, control, and comfort. Always verify your setting after changing terrain, and fine-tune as needed based on ride feedback. Properly adjusting sag for terrain ensures ideal suspension performance and safer, more confident riding.
Tailor Sag to Weight
To achieve ideal suspension performance, you must tailor your sag setting to your rider weight and riding style. This ensures excellent shock absorption and control under varying conditions. Heavier riders require increased preload to maintain proper sag, preventing bottoming out and excessive suspension travel. Conversely, lighter riders should reduce preload to avoid overly firm suspension, which hampers absorption. For aggressive riding styles, such as enduro or downhill, slightly increased sag allows for better impact absorption and traction. For smoother, cross-country riding, a more precise, slightly lower sag enhances efficiency and responsiveness. Always measure your sag with your gear and riding stance, then adjust preload accordingly. Properly tailored sag ensures your suspension performs predictably, improving comfort, handling, and overall ride quality. Suspension setup is a crucial aspect of optimizing your riding experience.
Match Riding Style
Matching your suspension sag to your riding style is essential for maximizing performance across different terrains and conditions. For aggressive downhill riding, you need less sag to enhance responsiveness and control. Cross-country riding benefits from slightly more sag, improving comfort and traction on varied surfaces. Trail riding requires a balanced setting to handle technical features and stability. Properly setting your suspension sag also helps prevent premature wear and maintains your bike’s optimal performance. Adjusting your suspension sag to match your riding style can significantly improve handling and comfort. Additionally, understanding the vetted options available for different bike types can help you select the best setup for your needs. Knowing how to properly measure sag ensures you achieve the ideal setup every time. Below is a guideline to tailor sag:
| Riding Style | Recommended Sag (%) | Focus Area |
|---|---|---|
| Downhill | 10-15% | Precision, stability |
| Cross-country | 15-20% | Comfort, efficiency |
| Trail | 12-18% | Balance, versatility |
| Enduro | 12-16% | Impact absorption, control |
Adjust sag accordingly to match your riding demands for ideal handling. Properly setting your suspension sag is crucial for ride quality and ensuring your bike performs optimally on diverse terrains.
Common Mistakes to Avoid When Setting Suspension Sag
Avoid using incorrect measurement techniques, as they lead to inaccurate sag settings that compromise handling. Always follow manufacturer specifications closely; ignoring them can result in improper suspension performance. Precision in measurement and adherence to guidelines are essential to optimize suspension behavior effectively.
Incorrect Sag Measurement Techniques
Incorrect sag measurement techniques can lead to inaccurate suspension adjustments, compromising ride quality and handling. One common mistake is measuring sag without ensuring the suspension is unloaded first; this results in overstated sag values. Another error is using inconsistent body positions—measuring with your gear or riding stance differs from the standard, skewing results. Failing to maintain consistent tire pressure during measurement also introduces errors, as changes in pressure affect suspension load. Additionally, measuring at different points on the suspension or using imprecise tools, like uncalibrated tape measures, reduces accuracy. Rushing the process or applying excessive force when settling the suspension can distort measurements. Precision is critical; any deviation from proper technique leads to incorrect sag settings that hinder ideal performance. Being aware of common pitfalls like these ensures you set your suspension like a pro in just 10 minutes. Properly maintaining suspension components, such as checking for wear or damage, can further improve measurement accuracy and overall ride quality.
Ignoring Manufacturer Specifications
Failing to adhere to the manufacturer’s recommended suspension sag specifications can lead to improper setup and compromised handling. Ignoring these guidelines risks incorrect preload settings, resulting in poor traction, uneven wear, or excessive suspension stiffness. Always consult your bike’s manual for precise sag targets tailored to your model. To illustrate the importance, consider the following specifications:
| Suspension Component | Recommended Sag Range | Adjustment Method |
|---|---|---|
| Front Fork | 20-30 mm | Tune preload collar |
| Rear Shock | 25-35 mm | Adjust preload ring |
| Rider Weight | Based on specifications | Add or remove spacers |
| Fork Oil Level | Specified volume | Refill to recommended level |
| Tire Pressure | As per manual | Adjust for desired feel |
Ignoring these specifics compromises suspension performance and rider safety.
Tips for Fine-Tuning Suspension Sag for Maximum Comfort and Control

Fine-tuning suspension sag is essential for maximizing both comfort and handling, as it directly influences ride quality and stability. To achieve precise adjustment, use a reliable scale to measure the static and rider-loaded sag, ensuring it aligns with manufacturer specifications. Adjust preload collars or spring tension incrementally—typically by quarter-turns—to refine the sag without overshooting. Focus on maintaining consistent weight distribution during measurements for accuracy. For maximum control, fine-tune the preload to match riding conditions: softer for comfort, firmer for aggressive handling. After each adjustment, test ride to assess responsiveness and comfort, making small incremental changes until ideal sag is achieved. Precise sag settings improve tire contact, reduce fatigue, and enhance overall suspension performance.
When to Recheck and Readjust Your Suspension Sag During Rides

Regularly rechecking your suspension sag during rides guarantees peak performance as conditions change. Key indicators include encountering increased bottoming or reduced responsiveness, which signal that your suspension no longer matches your current weight distribution or terrain. Reassess suspension sag after significant riding milestones—such as prolonged climbs, descents, or when terrain shifts from smooth to technical. Adjustments should also be made if you notice your bike handling feels off, like excessive pogoing or lack of control. Accurate rechecks involve stopping safely, measuring sag with the rider in riding position, and comparing to your target settings. Frequent rechecking ensures your suspension remains ideally tuned, maintaining comfort, traction, and control without sacrificing ride quality or safety. Additionally, staying informed about Gold IRA markets can help you plan your financial future while enjoying your riding pursuits. Incorporating proper suspension setup techniques can further enhance your ability to maintain optimal sag and overall bike performance.
Frequently Asked Questions
Can Improper Sag Adjustment Damage My Suspension Components?
Yes, improper sag adjustment can damage your suspension components. When the sag is too high or too low, it causes uneven load distribution, leading to excessive stress on parts like shocks, springs, and bushings. Over time, this can result in premature wear, leaks, or even failure. To prevent damage, accurately set the sag according to manufacturer specifications, ensuring ideal performance and longevity of your suspension system.
How Often Should I Check My Suspension Sag During a Ride?
You should check your suspension sag at least once every 100 to 200 miles or whenever you notice changes in ride quality. During rides, perform quick inspections after rough terrain or aggressive riding sessions, ensuring the sag remains within the recommended range. Regular checks help maintain ideal suspension performance, prevent component wear, and improve handling. Use a consistent method to measure sag, and adjust as needed to stay within manufacturer specifications.
Is There a Recommended Sag Setting for Heavy or Lightweight Riders?
Think of your suspension as a finely tuned instrument—heavy riders require more tension, while lightweight riders need less. For heavy riders, aim for 25-30% sag, roughly 30-40mm, to guarantee ideal support. Lightweight riders should target 15-20%, around 20-25mm, for responsiveness. Adjust sag by adding or removing preload, ensuring precise handling and comfort tailored to your weight. Always measure sag with your gear on for accurate setup.
What Signs Indicate My Suspension Sag Needs Rechecking?
You should recheck your suspension sag if you notice your bike feels excessively stiff or plush, or if your ride quality worsens after adjustments. Signs include inconsistent handling, increased rebound, or if your suspension doesn’t return to its normal position promptly. Additionally, if your rider weight changes considerably or you notice uneven sag between forks and shock, it’s time for a re-evaluation to guarantee peak performance and safety.
Are There Specific Tools Recommended for Precise Sag Measurement?
You should use a suspension sag measurement tool, such as a sag gauge or a specialized ruler with precision markings, for accurate results. A laser alignment system can also enhance accuracy, especially for high-performance applications. Guarantee the tools are calibrated correctly and have fine measurement increments. Using these precise instruments helps you set the suspension sag accurately, preventing excessive wear and ensuring ideal vehicle handling and ride quality.
Conclusion
Proper suspension sag is vital for ideal handling and safety; studies show that riders with correctly set sag experience a 15% improvement in control and stability. By following these steps, you can quickly master sag adjustment in just 10 minutes, ensuring your bike responds precisely to your riding style and terrain. Regular rechecks prevent performance degradation, keeping you confident and in control. Don’t overlook this essential setup—precision here translates directly into better rides and safer adventures.