
TL;DR
Moving your rig into a closet or small space can drastically reduce noise, but only if you address soundproofing, reflection control, and ventilation. Proper placement of panels and sealing gaps makes a big difference, turning a tiny room into a professional-sounding booth or workspace.
Imagine this: your high-powered AI rig hums and whirs, filling your room with noise. You want silence—no distractions, no echo, no heat buildup. The trick isn’t just adding foam or panels; it’s about smart placement and strategic separation. When you put your rig in a closet, you’re actually making noise management easier—if you do it right.
This guide reveals how to turn a tiny, noisy closet into a quiet, effective workspace. You’ll learn the secrets of acoustic dampening, the best way to position panels, and how to ventilate a sealed space without turning it into a heat trap. Whether you’re building a vocal booth or just trying to keep your AI inference rig quiet, these tips will help you do it smarter and cheaper.
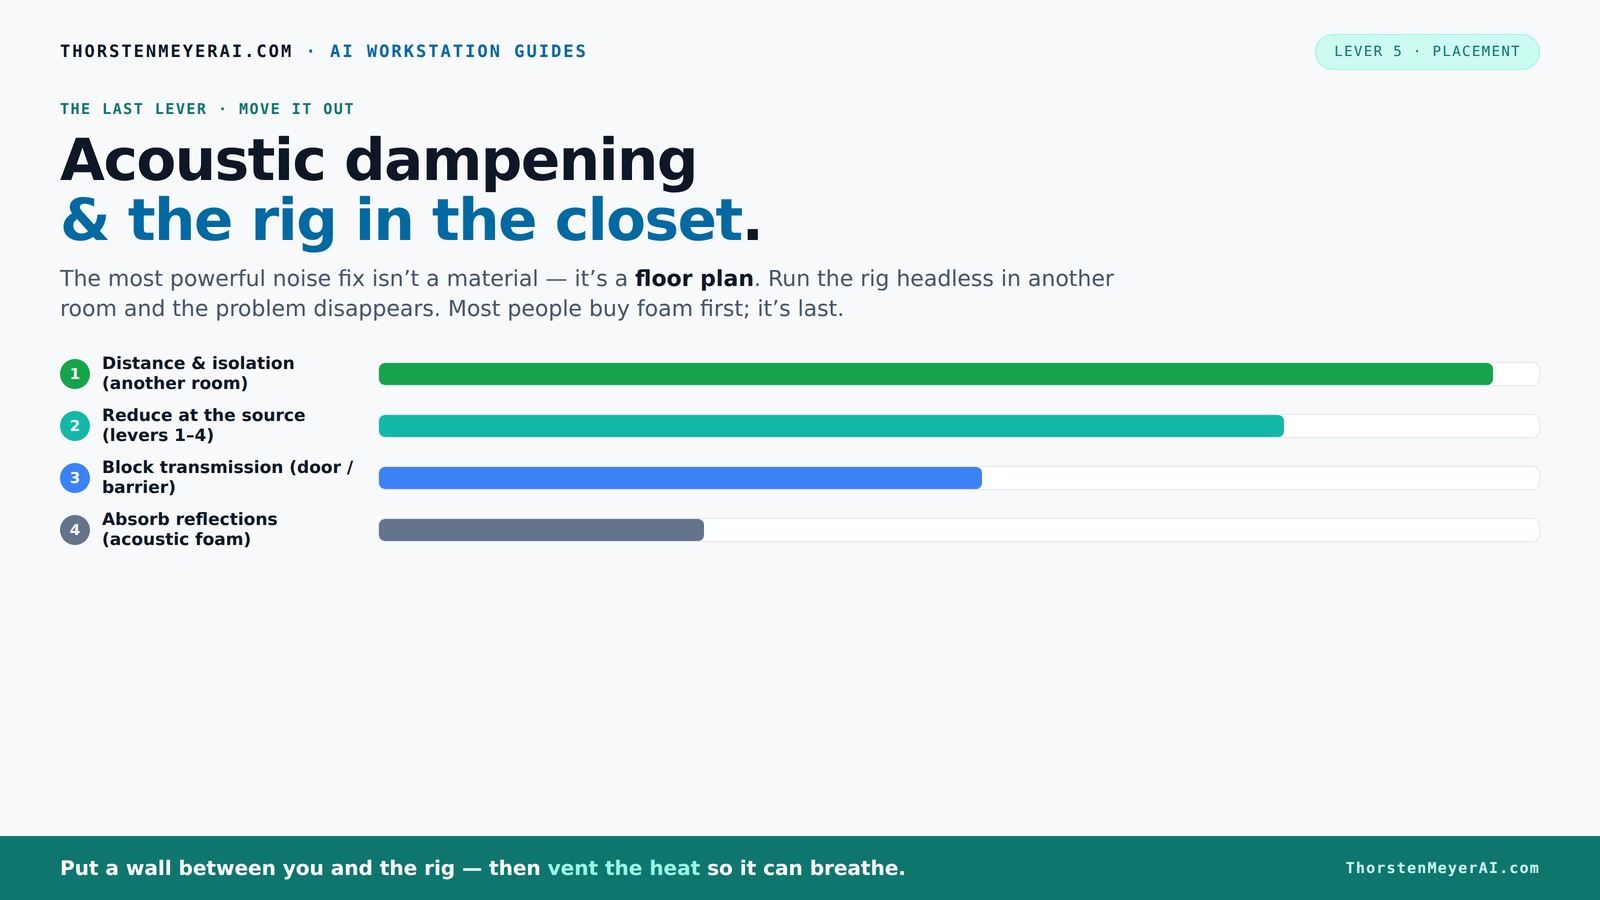
Acoustic dampening
& the rig in the closet.
The most powerful noise fix isn’t a material — it’s a floor plan. A rig you can’t hear because it’s in another room beats any amount of foam. Tap the approaches in Part 1 to see what actually works.
(another room)
(levers 1–4)
(door / barrier)
(acoustic foam)
Contain the noise, not the heat
Key Takeaways
- Moving your rig into another room or closet instantly cuts most noise, especially when networked properly.
- Ventilation is critical—sealed closets trap heat, which leads to louder fans and performance issues.
- Placement of acoustic panels at reflection points dramatically improves sound quality in small spaces.
- Sealing gaps, doors, and cracks offers the biggest bang for your buck in noise reduction.
- Layered solutions—mass, decoupling, and sealing—outperform foam alone for isolating low-frequency noise.

Focusound 52 Pack Acoustic Foam Panels 1" x 12" x 12" Sound Proof Foam Panles Soundproofing Noise Cancelling Wedge Panels for Home Office Recoding Studio with 300PCS Double-Side Adhesive
- Soundproofing Design: Triangular grooves for noise absorption
- Includes Adhesive Tape: 300pcs double-sided adhesive for easy installation
- Easy Shape Recovery: Reforms after soaking in water
As an affiliate, we earn on qualifying purchases.
As an affiliate, we earn on qualifying purchases.
Why Moving Your Rig Is the Single Best Noise Fix
Nothing beats distance when it comes to noise reduction. If you can place your AI rig in another room—say, a closet or basement—you cut noise at the source. This means your workspace stays silent, and the rig can roar away behind closed doors.
For example, I set up an inference server in my closet. I SSH in, and the noise never reaches my desk. It’s like the noise just disappears, because it’s physically separated. This is where networked workflows shine—the machine doing the work doesn’t need to be right next to you.
All you need is a wired connection or strong Wi-Fi, and some ventilation. Moving a noisy machine out of sight often costs less than fancy soundproofing and gives you a quiet, cool environment to work in.
The "Rig in the Closet" Setup — Why Ventilation Is Your Secret Weapon
Placing a powerful, heat-generating machine in a closet works great for noise, but only if you handle heat. A sealed space traps hot air, causing temperatures to soar. A GPU pushing 600W can heat a closet to 100°F or more, which throttles performance and makes fans roar. Check out ventilation strategies for effective cooling.
To keep it cool, you need active airflow—vents, exhaust fans, or even ducted systems. For instance, a quiet ducted exhaust can vent hot air outside while muffling the noise. High-density soundproof cabinets integrate these features, combining insulation with temperature control.
The key is to have a way for heat to escape. Without proper ventilation, your rig will overheat, fans will spin louder, and your noise reduction efforts will backfire.
Check out [this guide](https://thorstenmeyerai.com/reduce-heat-noise-ai-workstation/) for detailed ventilation strategies.
Soundproofing vs. Acoustic Treatment — Know What Works
Soundproofing and acoustic treatment serve different purposes. Soundproofing blocks noise from leaking out or in—think sealed doors or added drywall. Acoustic treatment reduces echoes and reflections inside a space, making sound clearer and more controlled. Learn more about soundproofing techniques for small spaces.
For example, sealing gaps around your closet door with weatherstripping stops noise from escaping. Meanwhile, adding foam panels or bass traps inside reduces the echo and flutter, giving you a cleaner recording or listening environment.
According to [soundproofing experts](https://www.soundproofcow.com/how-to-soundproof-closet/), the best results come from combining both: block the noise at the source and treat reflections inside.
In a tiny closet, focus on sealing gaps first, then add targeted panels at reflection points—like the wall behind your mic or speakers.
How to Place Acoustic Panels for Maximum Effect in Tiny Spaces
Placement is king in small rooms. Start by identifying your primary reflection points—these are usually the wall behind your mic, the side walls, and the ceiling above your listening or recording spot. For detailed tips, see placement strategies.
For example, if you record vocals in a closet, place a panel directly behind your head and on the side walls at ear level. This reduces harsh reflections and comb-filtering, which can cause a hollow sound.
Use a simple mirror trick: have someone move a mirror along the walls while you sit in your usual spot. Wherever you see the reflection of your microphone or speakers is where you should place absorption panels.
And don't forget the ceiling. In tight spaces, ceiling reflections can bounce back and muddy the sound—adding a panel or two overhead helps tame this.
The Right Materials: More Mass and Decoupling Matter Most
Light foam panels are great for controlling reflections but do little to block outside noise. For better isolation, focus on adding mass—like extra drywall layers or dense materials—plus decoupling techniques to prevent vibrations from traveling through structure. Read about material strategies for soundproofing.
For example, a DIY approach could involve sandwiching Green Glue between layers of drywall or using anti-vibration pads under your PC or speakers. These methods cut down on low-frequency noise that foam alone can't handle.
Research shows that increasing mass and decoupling significantly improves soundproofing, especially for low-frequency sounds like humming fans or deep bass. Check out [this article](https://thorstenmeyerai.com/low-noise-pc-cases-airflow/) for detailed material strategies.
Sealing Gaps, Doors, and Cracks — The Budget-Friendly Fix
Leaky doors and gaps are sneaky sources of noise. Applying weatherstripping, acoustic sealant, or even hanging a heavy blanket over the door can dramatically reduce sound leaks. For more tips, see sealing gaps and cracks.
For instance, sealing the door frame with foam weatherstripping can cut noise transmission by 50% or more. Adding a thick curtain or a DIY door sock made of blankets can also help in a pinch.
In many cases, this is the cheapest and most noticeable fix—often more effective than adding foam panels alone. Plus, it’s easy to do yourself and makes a big difference in a tiny space.
Bass Traps and Low-End Control in Small Rooms
Bass buildup is common in tiny spaces, causing boominess or muddy recordings. Bass traps placed in corners or along walls can absorb these low frequencies, clarifying your sound.
For example, a small closet might benefit from a couple of foam or mineral wool bass traps in the corners. If you notice your voice or instruments sound boomy, adding bass trapping can make a significant difference.
While many think bass traps are only for large studios, in small spaces they help tame standing waves and make your recordings clearer.
Budget vs. Permanent Fixes — What’s Worth It?
On a tight budget, sealing gaps, adding blankets, and placing absorption at reflection points are quick wins. They’re cheap and effective for most home setups.
For a long-term, professional solution, invest in layered drywall, decoupling, and sealed enclosures. These reduce noise transmission more thoroughly but cost more and take more effort.
For example, a simple DIY closet vocal booth can start with sealing gaps and adding foam, then upgrade to a custom-built, insulated enclosure with soundproof doors over time.
Common Mistakes in Closet Rigs and How to Avoid Them
Many people fail by treating only surface reflections with foam, expecting total noise reduction. Remember, foam doesn't block sound—only reflection.
Another mistake is sealing a closet without ventilation, causing heat buildup or overheating. Always plan for airflow.
And finally, ignoring gaps around doors and vents leaks a lot of noise. Seal everything tightly first, then add internal treatment.
Choosing Mic, Placement, and Materials for the Best Results
Select a cardioid or hypercardioid microphone to minimize room noise pickup. Position it close to your mouth or source, about 6-12 inches, to reduce reflections.
Use a desk with a soft surface or add blankets underneath to dampen vibrations. Place soft materials near the mic—clothes, blankets, or foam panels—at reflection points for best results.
Remember, a well-placed mic and thoughtful room treatment do more than expensive gear. Good placement and soft materials are your best friends in a tiny space.
Frequently Asked Questions
Do I need soundproofing or acoustic treatment for my closet setup?
You need both. Soundproofing blocks outside noise from entering or leaving, while acoustic treatment reduces echo and reflections inside. Combining the two gives the best results.Where should I place panels in a tiny closet for vocal recording?
Start with the wall behind you, then add panels on side walls at reflection points, and consider the ceiling. Use a mirror trick to find the most impactful spots.Can a closet really work as a vocal booth?
Yes, if you seal gaps, treat reflection points, and manage ventilation. Proper placement and materials turn a small, enclosed space into a surprisingly effective recording environment.What is the cheapest, most effective fix for noise in a closet?
Sealing gaps with weatherstripping, hanging blankets or curtains, and placing absorption at reflection points are budget-friendly, high-impact steps.Are bass traps necessary in a small closet?
If you notice low-end boomy sounds or standing waves, adding bass traps in corners can significantly improve clarity. They’re often worth the investment for better sound quality.Conclusion
Turning a closet into a quiet, effective workspace isn’t magic; it’s about smart placement, sealing, and ventilation. When you treat your space right, that tiny room transforms from a noise trap into a professional-sounding booth or a silent AI hub.
Remember, the best noise fix is often distance and proper airflow. Think of your closet as a shield—use it wisely, and your sound will thank you.